Surprises are foolish things. The pleasure is not enhanced, and the inconvenience is often considerable.
-Jane Austen
Haha! I disagree. I quite like them. I also like mysteries. Let us consider a quote from everyone's favorite strawberry-blonde, surface-diving, trouble-making, Ned Nickerson-dating sleuth.
"Lipstick is not just for looking glamorous;it can be used to signal for help on windows and other surfaces."
-Nancy Drew
Thank you Nancy. It is a shame I most often find myself wearing just cherry chapstick, which cannot be used to write anything.
And here is a surprise mystery for you.
In the last few weeks/days, I have purchased the following things/ingredients. What crafts and recipes are to come? I know. But I'm not telling.
yet.
1. 3 small glasses (they look like tiny wine glasses. is there a word for these?)
2. 1 yd pink fleece
3. A miniature rose bush
4. 1/2 gallon milk
5. A set of children's paint brushes
6. A turquoise placemat
7. A variety of solid color washcloths
8. Plain yogurt
hmmmmmmm........
Sunday, August 29, 2010
Saturday, August 21, 2010
Cowboy Cookies!
Short Post. Grad School/Life is a limiting reactant for this blog. (arg, did I just make a General Chemistry reference) This isn't something I did recently. But it is something I love to make.
Cowboy Cookies!!!
I love cookies, don’t you? I especially love cookies with lots of yummy stuff in them, like oatmeal, coconut, and chocolate chips. So here’s my favorite recipe for cowboy cookies. I’ve made these a lot, so I’ve been able to get the recipe fairly close to just how I like it. Actually, I did a whole research project on this recipe in college. So I suppose you could say it’s been through some moderately rigorous testing. And just for the record, these aren’t magic health cookies or anything. They are just tasty. Everything in moderation! Limited nutrition info is at the bottom. The picture looks like it was taken in a lab. That's because it was. Sorry
I love cookies, don’t you? I especially love cookies with lots of yummy stuff in them, like oatmeal, coconut, and chocolate chips. So here’s my favorite recipe for cowboy cookies. I’ve made these a lot, so I’ve been able to get the recipe fairly close to just how I like it. Actually, I did a whole research project on this recipe in college. So I suppose you could say it’s been through some moderately rigorous testing. And just for the record, these aren’t magic health cookies or anything. They are just tasty. Everything in moderation! Limited nutrition info is at the bottom. The picture looks like it was taken in a lab. That's because it was. Sorry
 |
| Mmmmmm Science! |
1 c. butter
1 c. sugar
1 c. brown sugar
2 eggs
1 c. oatmeal
1 c. coconut
2 c. chocolate chips
2 c. flour
1/2 tsp. salt
1 tsp. soda
1/2 tsp. baking powder
1 tsp. vanilla
1 c. sugar
1 c. brown sugar
2 eggs
1 c. oatmeal
1 c. coconut
2 c. chocolate chips
2 c. flour
1/2 tsp. salt
1 tsp. soda
1/2 tsp. baking powder
1 tsp. vanilla
Cream together sugars, butter, eggs and vanilla. In another bowl, combine flour, salt, soda and baking powder and add to creamed mixture. Add coconut, oatmeal and chocolate chips. Drop onto greased baking sheet. Bake 15 minutes at 350 degrees. (watch them. They can go fast, it might not take 15 minutes. But I have a temperamental oven.
Per Cookie: Calories 104.50 kcal. Carbohydrates 14.34 g. Sugar 9.97 g
Saturday, August 14, 2010
A Tribute to the US of A
Independence Day!
Before we begin, here’s a little disclaimer.
I like ruffles.
I like nautical themed things.
I like red, white, and blue.
I like lace.
…..and I used all of those things in making this shirt. Yikes!
Some of you will love it, some of you will hate it. I know the fourth has passed, but I consider everyday I have a glass of sweet iced tea a celebration of American freedom (right?). It was for Independence Day, but I’ve already worn it on a non-holiday as well and I liked it just fine that day too.
Here’s a picture of the aforementioned shirt. (please note the giant gold anchor earrings, which actually ARE from the 80’s, and belong to my mother) Sometimes too far is just far enough.
 |
| I've seen so many episodes of America's Next Top Model, and all I can come up with is "Hand On Chair". |
I didn’t take pictures while making it, so it is going to be sort of hard to do a “how-to-make-this” type post. It's a fun way to "spice up" a regular old tank top, though. Basically, I hemmed narrow rows of red and gathered them to make ruffles, pinned them to the tank top, and sewed them on with my machine. Then, I covered up all the unsightly ends with eyelet lace and sewed that on. (also, I hand-stitched eyelet lace around the neck and back.) Finally, I sewed on some big, gold, nautical type buttons with anchors on them. I know giant gold anchor buttons are a bit 80’s, but it was fun, and festive, and I just wanted them. I didn't measure anything, just "eyeballed" it, so it's sort of great that it came out looking so symmetrical.

 |
| (so you can see how far I spaced out the ruffles) |
Special Thanks to…
Mom, for lending me her gold anchor earrings. And for teaching me to sew long ago.
Tuesday, August 10, 2010
Teapot Art
Hi. Welcome to my blog. It’s called “Court Could Make That”. I wanted it to be “I” instead of Court, you know, to appeal to the every man, but it wasn’t available, so now it’s just oddly-third-personish. I don’t like to buy things that I feel like I could make on my own fairly well. Also, I like creating. Crafting. Cooking. Whatver.
Now, before you get worried that this is going to be one of those blogs where people make things and post tutorials that are a million pages long, it’s not. I’m amazed those people can make tutorials that long and detailed. Sometimes I follow recipes, patterns, and tutorials. Sometimes, I don’t.
Anyway, back to the matter at hand.
When I’m out and about, and I see (or eat!) something wonderful, I tend to ask myself this question: “Could I Make That?” If the answer is “I could make that” or even “Maybe I could make that”, I write it down (or take a picture of it on my phone) and when I’ve got a free moment, I go to work.
I’m hoping to convince my very talented and creative friends to do guest posts for me sometimes. So, talented and creative friends, fire up your engines.
Enough rambling!
Let’s begin.
This is a lovely little project I affectionately, but not very creatively, named “Teapot Art”. There are pictures at the bottom of this post if you just can't stand the wait!!
I love tea. I love teapots. I love teaparties.
Also, I recently moved into a new place. My walls needed something fun. I saw some really interesting silhouette art at a shop a while back, nothing too fancy, just black shapes on cream paper in a frame. They had the usual things, you know, the Eiffel tower, a high heel, etc, etc. Liked it. Didn’t LOVE it.
Yessir, I could make that (BETTER, even).
Step One: Gather old frames. I wanted oldish looking frames painted silver and gold. I found the big ones at a thrift store and the little ones at the dollar store. I thought about painting them. I didn’t. You could. Either way, it would be grand. I just didn’t FEEL like it that day. (maybe I should have called this blog LazyCrafts? Sometimes my crafts and recipes are lazy. No, let us call them “time-efficient”)
Step Two: Backgrounds. Cream is fine, white is nice, but I wanted color. I thought about using pretty scrapbook paper. I didn’t have pretty scrapbook paper. I did have a lot of fabric scraps. I chose three patterns I liked. A green with little white flowers, a yellow with lots of big flowers, and a nice red check.
Step Three: Silhouettes. Teapots! Tea cups! Sugar Bowls! Milk Pitchers! I wanted a whole tea service on my wall, really. I got a sheet of black poster board and cut out my tea things. If I couldn’t find a picture on the internet to trace, I freehanded it. If I couldn’t freehand it, I asked my highly gifted art teacher roommate to draw it for me.
Step Three: Assemble! I hot glued the fabric to the cardboard part of the frame-insides, affixed the silhouettes with a bit of double sided table, put the frames back together and that’s it.
Pretty easy, I think. There’s not even any sewing in this one! Also, fast. And inexpensive! What’s not to love? Of course, you may not have a passion for teapots like me. You could do any silhouette you liked! Your pet? Your family? Your car? I don’t know. The ever-popular Eiffel Tower France besides the Eiffel Tower
Here’s a picture of how mine turned out. It’s in a corner, which wasn’t my original plan, but it’s just where it had to go in the end. I like it though. Oh! And that hook thing is a really cute teapot hook I just had to have (99 cents, yay!). I need something to hang on it, though! Please excuse my poor photography skills.
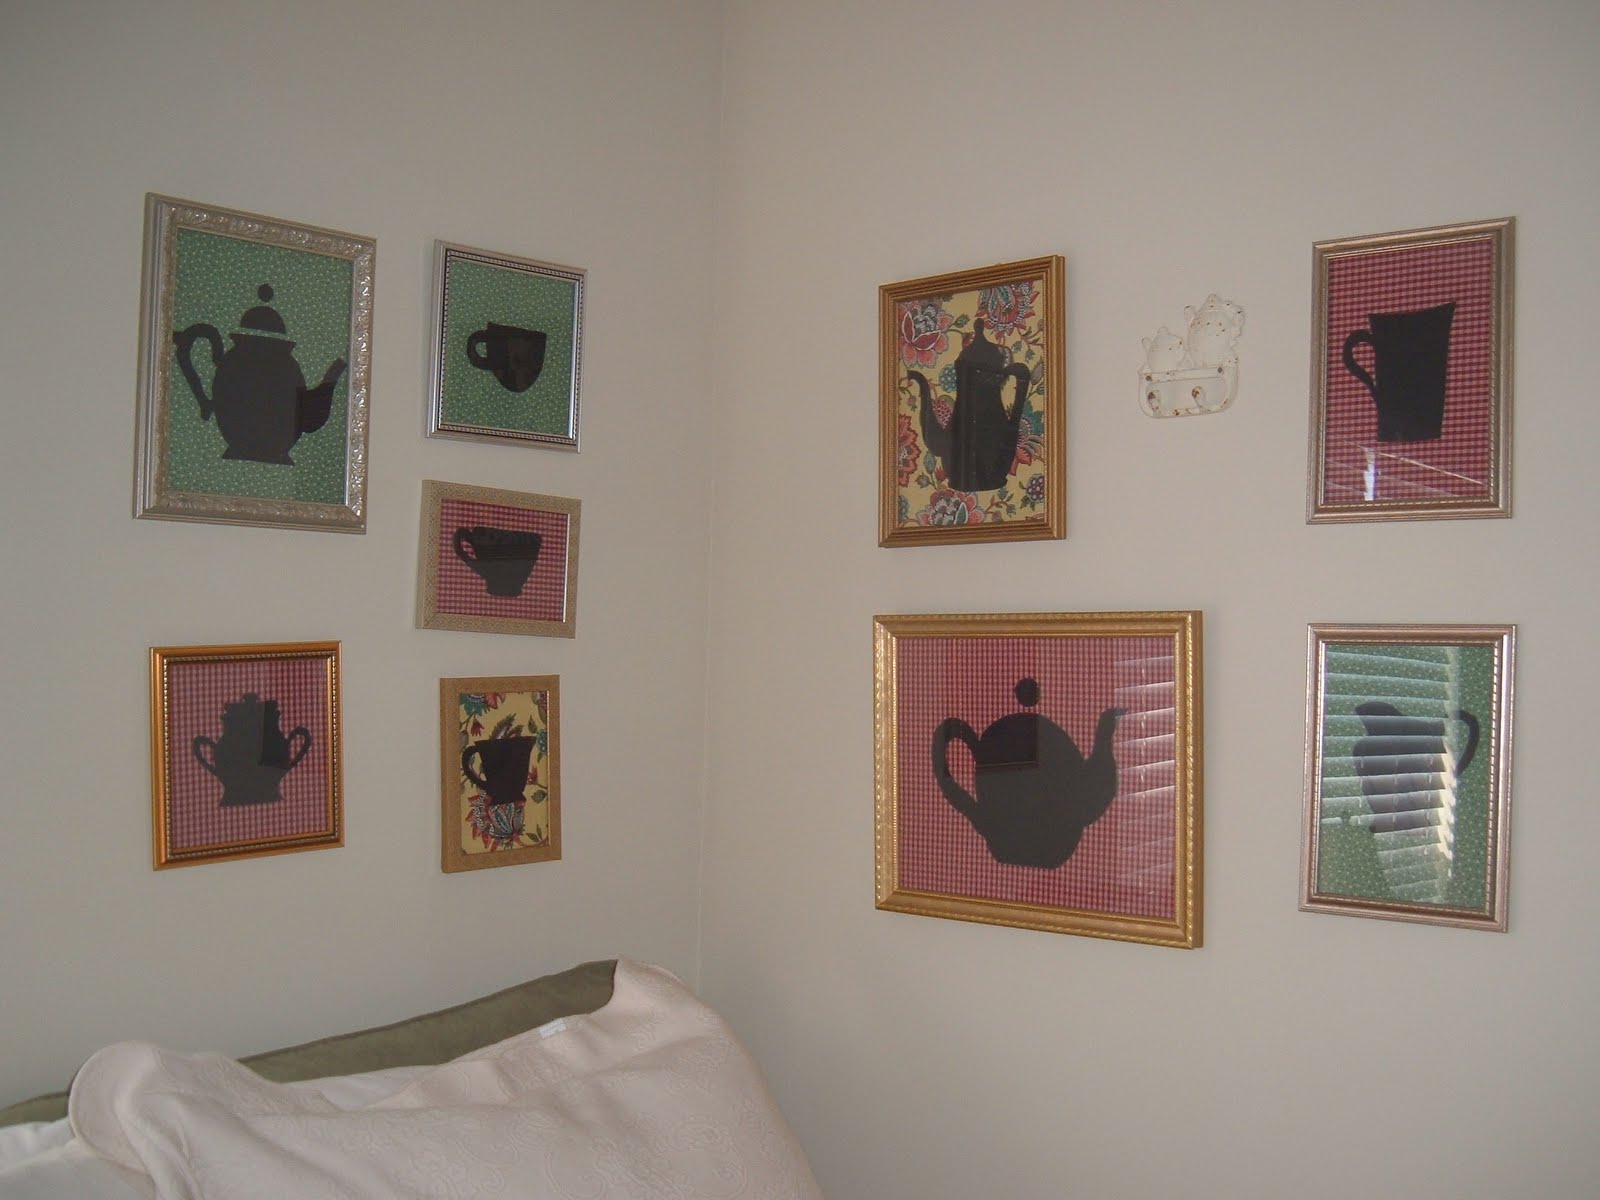 |
| Ta-da. Yes, a little crooked. I fixed it for the next one. |
 |
| And up close (yikes, window glare. Can you see my lamp?) |
 |
| The other side |
Special Thanks To:
Whit, for drawing my sugar bowl and milk pitcher.
Mary, for some of my fabric scraps.
Whitney, for taking me to the awesome store where I found my teapot hook.
Mom, for helping me arrange them on the wall.
Dad, for hanging them.
Subscribe to:
Posts (Atom)